
हैलो दोस्तों, आप सभी का इस वेबसाईट पर स्वागत है। यदि आप भी वेब डिजाइन सीखना चाहते हैं तो आप बिल्कुल सही जगह हैं। इस पेज मे आप वेब डिजाइन के अंतर्गत एचटीएमएल को बहुत ही ईजी वे (Easy Way) समझाया गया है, आप एचटीएमएल के सम्पूर्ण नोट्स स्टेप बाई स्टेप सरल हिन्दी भाषा मे (HTML Notes in Hindi) प्राप्त करेंगे। इन सभी नोट्स की आप आसानी से प्रैक्टिस कर सकते हैं, जो आपको एचटीएमएल सीखने और समझने में बहुत हेल्प करेंगे। तो चलिए HTML Notes in Hindi का यह चैप्टर स्टार्ट करते हैं।

HTML Basics Overview : HTML Notes in Hindi
HTML का पूरा नाम Hyper Text Markup language है। यह एक मार्कप लैंग्वेज है इसका इस्तेमाल वेबपेज (Webpage) डेवलप करने के लिए किया जाता है। HTML का पहला संस्करण 1993 में टिम बर्नर्स-ली (Tim Berners-Lee) द्वारा लिखा गया था। इस लैंग्वेज मे वेबपेज को लिखने के लिए विभिन्न टैग्स (Tags) का उपयोग किया जाता है। HTML कोड को Notepad जैसे टेक्सट एडिटर अप्लीकेशन पर लिखा जा सकता है तथा लिखे गए कोड का आउटपुट किसी भी वेबब्राउजर जैसे Chrome या Microsoft Edge पर देखा जा सकता है। HTML फाइल को सेव (Save) करने के लिए फाइल नेम के अंत मे .htm या .html लगाना जरूरी होता है, जैसे – myfile.html या myfile.htm आदि।
HTML Elements
HTML एलिमेंट्स वेबपेज पर सूचनाओं को प्रदर्शित कराने के लिए उपयोग किए जाते हैं, जैसे – हेडिंग, पैराग्राफ, टेबल आदि। एचटीएमएल एलिमेंट्स से संबंधित बातें निम्न प्रकार हैं।
HTML Tags – वेबपेज पर विभिन्न जानकारियां जैसे – हेडिंग, पैराग्राफ, लिस्ट, इमेज आदि को प्रदर्शित कराने के लिए एचटीएमएल टैग (Tag) का प्रयोग किया जाता है। किस टैग को < से प्रारंभ तथा > से समाप्त किया जाता है, जैसे – <html>, <body> आदि। टैग दो प्रकार के होते हैं, सिंगल और जोड़ा। सिंगल टैग चालू तो किया जाता है लेकिन इसे बंद करने की आवश्यकता नहीं होती है। जोड़ा टैग (Paired Tag) को चालू किया जाता है तो बंद भी किया जाता है। इन्हे ओपनिंग/क्लोज़िंग टैग भी कहते हैं। इनके उदाहरण हैं-
Single Tag – <br>, <hr>
Paired Tag – <h1>…</h1>, <p>…</p>
Tag Attributes – ऐट्रब्यूट यानि टैग के गुण, इनका उपयोग किसी टैग की प्रॉपर्टी को निर्धारित करने के लिए किया जाता है, जैसे – <body> टैग मे bgcolor प्रॉपर्टी का इस्तेमाल करके बॉडी का बैकग्राउंड कलर सेट सकते है। इसी प्रकार <p> यानि पैराग्राफ टैग मे align प्रॉपर्टी का इस्तेमाल कर पैराग्राफ को right, left या center मे सेट कर सकते हैं।
Attributes Value – किसी टैग की प्रॉपर्टी जैसे – bgcolor, इसमे जो भी रंग का नाम दिया जाएगा वह वैल्यू (Value) कहलाएगा। इसी प्रकार align प्रॉपर्टी मे right, left आदि value हैं।
HTML Document Structure
HTML डॉक्यूमेंट स्ट्रक्चर यह बताता है कि HTML पेज बनाने के लिए कौन से टैग (Tag) किस पोजीशन मे रखे जाएंगे। नीचे दिए गए सोर्स कोड मे यह बताया गया है।
Source Code
<html>
<head>
<title>HTML Notes in Hindi</title>
</head>
<body>
HTML stands for Hyper Text Markup Language. It's the standard markup language for creating web pages and web applications.
</body>
</html>
Code Output 👇
<html> Tag – इस टैग को कोड के प्रारंभ मे लगाया जाता है, तथा इसे </html> टैग द्वारा डाक्यूमेंट के अंत मे बंद किया जाता है। यह टैग ब्राउजर को यह बताता है कि इन दोनों टैग के बीच मे HTML कोड लिखा गया है।
<head> Tag – इस टैग में हेडर इनफार्मेशन जैसे टाइटल बार मे नजर आने वाला टेक्सट, CSS स्टाइल तथा मेटा (Meta) जानकारी लिखी जाती है। यह टैग <body> टैग से पूर्व ही इस्तेमाल किया जाता है। इसे भी <head> टैग से ओपन और </head> टैग से क्लोज़ करते है।
HTML Body
HTML मे <body> टैग का इस्तेमाल वेबपेज की इनफार्मेशन को प्रदर्शित के लिए किया जाता है, जैसे – हेडिंग, पैराग्राफ, पिक्चर्स आदि। जो भी इनफार्मेशन बॉडी (Body) टैग के अंदर लिखी जाती है वही ब्राउजर मे आउटपुट के रूप मे प्रदर्शित होती है। <body> टैग के विभिन्न ऐट्रब्यूट भी होते हैं जिनका इस्तेमाल करके बॉडी का कलर, बैकग्राउंड, टेक्सट कलर, मार्जिन आदि सेट की जा सकती है। नीचे <body> टैग का इस्तेमाल उदाहरण सहित Source Code के साथ बताया गया है।
| Body Attributes | Description |
| background | पेज मे बैकग्राउंड इमेज सेट करने के लिए <body background=”image.jpg”> |
| bgcolor | पेज मे बैकग्राउंड कलर सेट करने के लिए <body bgcolor=”red”> |
| text | टेक्सट का कलर सेट करने के लिए <body text=”white”> |
| topmargin | टॉप से जगह छोड़ने के लिए <body topmargin=”20″> |
| leftmargin | लेफ्ट से जगह छोड़ने के लिए <body leftmargin=”10″> |
Source Code
<html>
<head>
<title>HTML Body</title>
</head>
<body bgcolor="red" text="white" topmargin="20" leftmargin="20">
<h2>What is CPU?</h2>
<p>The CPU, or Central Processing Unit, is the "brain" of your computer. It's a tiny chip inside your computer that carries out all the instructions of the programs you use.<p>
</body>
</html>
Code Output 👇
HTML Heading
HTML मे किसी टेक्सट को हेडिंग बनाने के लिए H1 से H6 तक 6 लेवल होते हैं, इसमे H1 हेडिंग का साइज़ सबसे बड़ा तथा H6 साइज़ मे सबसे छोटा होता है। नीचे हेडिंग के उदाहरण तथा उसका Source Code बताया गया है।
Source Code
<html>
<head>
<title>HTML Heading</title>
</head>
<body>
<h1>This is Heading Level 1</h1>
<h2>This is Heading Level 2</h2>
<h3>This is Heading Level 3</h3>
<h4>This is Heading Level 4</h4>
<h5>This is Heading Level 5</h5>
<h6>This is Heading Level 6</h6>
</body>
</html>
Code Output 👇
This is Heading Level 1
This is Heading Level 2
This is Heading Level 3
This is Heading Level 4
This is Heading Level 5
This is Heading Level 6
HTML Paragraph
HTML मे टेक्सट को पैराग्राफ बनाने के लिए <p> टैग का इस्तेमाल किया जाता है। प्रत्येक पैराग्राफ नई लाइन से स्टार्ट होता है। नीचे पैराग्राफ का उदाहरण तथा उसका Source Code बताया गया है।
Source Code
<html>
<head>
<title>HTML Paragraph</title>
</head>
<body>
<h3>What is CPU?</h3>
<p>The CPU, or Central Processing Unit, is the "brain" of your computer. It's a tiny chip inside your computer that carries out all the instructions of the programs you use.</p>
<p>The CPU works by repeatedly fetching instructions from memory, decoding them, executing them, and then storing the results back in memory. This cycle happens billions of times per second, making your computer fast and responsive.</p>
</body>
</html>
Code Output 👇
What is CPU?
The CPU, or Central Processing Unit, is the “brain” of your computer. It’s a tiny chip inside your computer that carries out all the instructions of the programs you use.
The CPU works by repeatedly fetching instructions from memory, decoding them, executing them, and then storing the results back in memory. This cycle happens billions of times per second, making your computer fast and responsive.
HTML Alignment
HTML मे टेक्सट/पैराग्राफ या हेडिंग को अलाइनमेंट किया जा सकता है। नीचे पैराग्राफ व हेडिंग के लिए अलाइनमेंट उदाहरण Source Code सहित बताया गया है।
Source Code
<html>
<head>
<title>HTML Paragraph</title>
</head>
<body>
<h2 align="center">What is CPU?</h2>
<p align="left">The CPU, or Central Processing Unit, is the "brain" of your computer. It's a tiny chip inside your computer that carries out all the instructions of the programs you use.</p>
<p align="right">The CPU works by repeatedly fetching instructions from memory, decoding them, executing them, and then storing the results back in memory. This cycle happens billions of times per second, making your computer fast and responsive.</p>
</body>
</html>
Code Output 👇
What is CPU?
The CPU, or Central Processing Unit, is the “brain” of your computer. It’s a tiny chip inside your computer that carries out all the instructions of the programs you use.
The CPU works by repeatedly fetching instructions from memory, decoding them, executing them, and then storing the results back in memory. This cycle happens billions of times per second, making your computer fast and responsive.
HTML Formatting
HTML मे टेक्सट को फॉर्मैट करने के लिए विभिन्न टैग का इस्तेमाल किया जाता है। जैसे – टेक्सट को बोल्ड करने के लिए <b> टैग, इटैलिक करने के लिए <i> टैग, अंडरलाइन करने के लिए <u> टैग आदि। नीचे टेक्सट को फॉर्मैट करने के लिए विभिन्न टैग का इस्तेमाल उदाहरण सहित Source Code के साथ बताया गया है।
Source Code
<html>
<head>
<title>HTML Formatting</title>
</head>
<body>
<p>This is normal paragraph text</p>
<p><b>This is bold paragraph text</b></p>
<p><i>This is italic paragraph text</i></p>
<p><u>This is underline paragraph text</u></p>
<p><strike>This is underline paragraph text</strike></p>
<p><big>This is big paragraph text</big></p>
<p><small>This is small paragraph text</small></p>
<p><strong>This is strong paragraph text</strong></p>
<p>This is <sup>superscript</sup> text</p>
<p>This is <sub>subscript</sub> text</p>
</body>
</html>
Code Output 👇
This is normal paragraph text
This is bold paragraph text
This is italic paragraph text
This is underline paragraph text
This is underline paragraph text
This is big paragraph text
This is small paragraph text
This is strong paragraph text
This is superscript text
This is subscript text
HTML Pre-formatted Text
HTML मे पैराग्राफ या टेक्सट लिखते समय एक से अधिक स्पेस (Multiple Spaces) या न्यू लाइन (New line) मान्य नहीं है, इसका मतलब यदि आप दो शब्दों के बीच एक से अधिक स्पेस देते है तो एक ही स्पेस काउन्ट (Count) होगा। इसी प्रकार यदि आप नई लाइन से टेक्सट लिखते हैं तो आउटपुट मे टेक्सट नई लाइन से नहीं आएगा। यदि आप जैसा लिखते है वैसा ही आउटपुट चाहते है तो <pre> टैग का इस्तेमाल करना होगा। नीचे <pre> टैग का इस्तेमाल उदाहरण सहित Source Code के साथ बताया गया है।
Source Code
<html>
<head>
<title>HTML Pre</title>
</head>
<body>
<p>The       CPU, or Central Processing         Unit, is the "brain" of your computer.
It's a tiny chip inside your computer that carries out
all the instructions of the programs you use.</p>
<pre>The       CPU, or Central Processing         Unit, is the "brain" of your computer.
It's a tiny chip inside your computer that carries out
all the instructions of the programs you use.</pre>
</body>
</html>
Code Output 👇
The CPU, or Central Processing Unit, is the “brain” of your computer. It’s a tiny chip inside your computer that carries out all the instructions of the programs you use.
The       CPU, or Central Processing         Unit, is the "brain" of your computer.
It's a tiny chip inside your computer that carries out
all the instructions of the programs you use.
HTML Font
HTML मे <font> टैग का इस्तेमाल टेक्सट का फॉन्ट स्टाइल बदलने के लिए, फॉन्ट साइज़, फॉन्ट कलर बदलने के लिए किया जाता है। नीचे फॉन्ट (Font) टैग का इस्तेमाल उदाहरण सहित Source Code के साथ बताया गया है।
| Font Attributes | Description |
| face | फॉन्ट टाइप चेंज करने के लिए <font face=”arial black”> |
| color | फॉन्ट का रंग चेंज करने के लिए <font color=”red”> |
| size | फॉन्ट का साइज़ चेंज करने के लिए <font size=”10″> |
Source Code
<html>
<head>
<title>HTML Font</title>
</head>
<body>
<p>This is default text font</p>
<p><font face="arial black">This is arial black font</font></p>
<p><font size="5">This is 5 size font</font></p>
<p><font color="red">This is red color font</font></p>
<p><font face="arial black" size="5" color="red">This is arial black, 5 size and red color font</font></p>
</body>
</html>
Code Output 👇
This is default text font
This is arial black font
This is 5 size font
This is red color font
This is arial black, 5 size and red color font
HTML <br> and <hr> Tag
HTML मे <br> टैग का इस्तेमाल टेक्सट को नई लाइन (New Line) से लिखने के लिए तथा <hr> टैग का इस्तेमाल एक होरीजॉन्टल लाइन जोड़ने के लिए किया जाता है। नीचे <br> और <hr> टैग का इस्तेमाल उदाहरण सहित Source Code के साथ बताया गया है।
Source Code
<html>
<head>
<title>HTML New Line</title>
</head>
<body>
<p>The CPU, or Central Processing Unit, is the "brain" of your computer. <br> It's a tiny chip inside your computer that carries out all the instructions of the programs you use.<hr>
The CPU works by repeatedly fetching instructions from memory, decoding them, executing them, and then storing the results back in memory. <br> This cycle happens billions of times per second, making your computer fast and responsive.</p>
<hr size="20" width="50%" color="red" align="left">
<br><br>
<p>This is HTML Language</p>
</body>
</html>
Code Output 👇
The CPU, or Central Processing Unit, is the “brain” of your computer.
It’s a tiny chip inside your computer that carries out all the instructions of the programs you use.
The CPU works by repeatedly fetching instructions from memory, decoding them, executing them, and then storing the results back in memory. This cycle happens billions of times per second, making your computer fast and responsive.
This is HTML Language
HTML Comments
HTML मे कमेन्ट का इस्तेमाल किसी कोड को इक्स्प्लैन करने के लिए किया जाता है, कमेन्ट टैग के अंदर लिखी गई जानकारी आउटपुट मे प्रदर्शित नहीं होती है। नीचे कमेन्ट टैग का इस्तेमाल उदाहरण सहित Source Code के साथ बताया गया है।
Source Code
<html>
<head>
<title>HTML New Line</title>
</head>
<body>
<!This is Paragraph one>
<p>The CPU, or Central Processing Unit, is the "brain" of your computer. It's a tiny chip inside your computer that carries out all the instructions of the programs you use.
<!This is Paragraph two>
<p>The CPU works by repeatedly fetching instructions from memory, decoding them, executing them, and then storing the results back in memory. This cycle happens billions of times per second, making your computer fast and responsive.</p>
</body>
</html>
Code Output 👇
The CPU, or Central Processing Unit, is the “brain” of your computer. It’s a tiny chip inside your computer that carries out all the instructions of the programs you use.
The CPU works by repeatedly fetching instructions from memory, decoding them, executing them, and then storing the results back in memory. This cycle happens billions of times per second, making your computer fast and responsive.
HTML Images
HTML डॉक्यूमेंट मे किसी फोटो या इमेज को इन्सर्ट कराने के लिए <image> टैग का उपयोग किया जाता है। जिस इमेज को पेज मे इन्सर्ट करना है, उस इमेज को वही स्टोर करें जहां फाइल सेव की गई है। इसके बाद इमेज का नाम src ऐट्रब्यूट मे टाइप करें। ध्यान रखें इमेज फाइल टाइप जो है वही टाइप करें, जैसे – image.jpg, image.png इत्यादि। नीचे <image> टैग का इस्तेमाल उदाहरण सहित Source Code के साथ बताया गया है।
| Image Attributes | Value | Description |
| src | image name | इमेज का पाथ (Path)/लोकैशन देने के लिए |
| width | number or pixel | इमेज की चौड़ाई सेट करने के लिए |
| height | number or pixel | इमेज की ऊंचाई सेट करने के लिए |
| align | right, left, center | इमेज का अलाइनमेंट सेट करने के लिए |
| border | number or pixel | इमेज बॉर्डर सेट करने के लिए |
| hspace | number | इमेज के बीच होरीजॉन्टल स्पेस देने के लिए |
| vspace | number | इमेज के बीच वर्टिकल स्पेस देने के लिए |
| alt | text | इमेज लोड न हो पाने की स्थिति मे ऑल्टरनेट टेक्सट दिखाने के लिए |
Source Code
<html>
<head>
<title>HTML Images</title>
</head>
<body>
<h4>Windows Images</h4>
<img src="ImageName.jpg" height="170" width="250" hspace="10" vspace="10" alt="Image not found" border="1">
<img src="ImageName.jpg" height="170" width="250" hspace="10" vspace="10" alt="Image not found" border="1">
<img src="ImageName.jpg" height="170" width="250" hspace="10" vspace="10" alt="Image not found" border="1">
<img src="ImageName.jpg" height="170" width="250" hspace="10" vspace="10" alt="Image not found" border="1">
<img src="ImageName.jpg" height="170" width="250" hspace="10" vspace="10" alt="Image not found" border="1">
</body>
</html>
Code Output 👇
HTML Audio
HTML पेज मे <audio> टैग का उपयोग म्यूजिक या ऑडिओ फाइल जोड़ने के लिए किया जाता है। औडियो <audio> टैग के विभिन्न ऐट्रब्यूट द्वारा औडियो प्ले को कंट्रोल भी कर सकते हैं। जैसे – Volume Control, Play Back Speed, loop इत्यादि। HTML मे तीन तरह के औडियो फाइल फॉर्मैट (MP3, WAV, and OGGसपोर्ट करते हैं। नीचे दिए गए सोर्स कोड मे Audio टैग का उपयोग आउटपुट के साथ बताया गया है।
| Audio Attributes | Value | Description |
| autoplay | autoplay | कंट्रोल्स लोड होते ही औडियो प्ले होना चालू |
| controls | controls | औडियो कंट्रोल लोड करने के लिए |
| loop | loop | औडियो समाप्त होने पर पुनः चालू |
| muted | muted | औडियो को म्यूट (Mute) करने के लिए |
| src | url/path/filename | औडियो फाइल का सोर्स एड्रैस देने के लिए |
| preload | none, metadata, auto | None- मेटाडाटा लोड न करना, Metadata- मेटाडाटा लोड करना जैसे समय, Auto- डिफ़ॉल्ट वैल्यू। |
Source Code
<html>
<head>
<title>HTML Images</title>
</head>
<body>
<p>This is Audio Example</p>
<audio controls>
  <source src="fileName.ogg" type="audio/ogg">
  <source src="fileName.mp3" type="audio/mpeg">
  Your browser does not support the audio tag.
</audio>
<p>Audio AutoPlay Muted</p>
<audio controls autoplay muted>
  <source src="fileName.ogg" type="audio/ogg">
  <source src="fileName.mp3" type="audio/mpeg">
  Your browser does not support the audio tag.
</audio>
</body>
</html>
Code Output 👇
This is Audio Example
HTML Video
HTML पेज मे <audio> टैग की तरह ही <video> टैग का उपयोग विडिओ फाइल जोड़ने के लिए किया जाता है। विडिओ <video> टैग के विभिन्न ऐट्रब्यूट द्वारा विडिओ प्ले को कंट्रोल भी कर सकते हैं। जैसे – Volume Control, Play Back Speed, AutoPlay इत्यादि। HTML मे तीन तरह के विडिओ फाइल फॉर्मैट (MP4, WebM, and OGG) सपोर्ट करते हैं। नीचे दिए गए सोर्स कोड मे Video टैग का उपयोग आउटपुट के साथ बताया गया है।
| Video Attributes | Value | Description |
| autoplay | autoplay | कंट्रोल्स लोड होते ही विडिओ प्ले होना चालू करें |
| controls | controls | विडिओ कंट्रोल लोड करने के लिए |
| loop | loop | विडिओ समाप्त होने पर पुनः चालू |
| muted | muted | विडिओ की आवाज को म्यूट (Mute) करें |
| src | url/path/filename | विडिओ फाइल का सोर्स एड्रैस देने के लिए |
| preload | none, metadata, auto | None- मेटाडाटा लोड न करना, Metadata- मेटाडाटा लोड करना जैसे समय व अन्य जानकारी, Auto- डिफ़ॉल्ट वैल्यू। |
| height | pixel | विडिओ प्लेयर की हाइट सेट करने के लिए |
| width | pixel | विडिओ प्लेयर की चौड़ाई सेट करने के लिए |
| poster | url | वीडियो डाउनलोड होते समय या यूजर द्वारा प्ले बटन दबाने पर दिखाई जाने वाली पिक्चर निर्दिष्ट करने के लिए |
Source Code
<html>
<head>
<title>HTML Images</title>
</head>
<body>
<p>This is Video Example</p>
<video width="600" height="300" controls>
  <source src="movie.mp4" type="video/mp4">
  <source src="movie.ogg" type="video/ogg">
  Your browser does not support the video tag.
</video>
<p>This Video AutoPlay with Muted</p>
<video width="600" height="300" controls autoplay muted>
  <source src="movie.mp4" type="video/mp4">
  <source src="movie.ogg" type="video/ogg">
  Your browser does not support the video tag.
</video>
</body>
</html>
Code Output 👇
This is Video Example
HTML Marquee
HTML मे <marquee> टैग के द्वारा विभिन्न एचटीएमएल एलेमेन्ट (HTML Element) जैसे – हेडिंग, पैराग्राफ, इमेज आदि को डिफरेंट डिरेक्शिन मे स्क्रॉल या मूव करा सकते हैं। <marquee> टैग के विभिन्न ऐट्रब्यूट का उपयोग करके एलेमेन्ट को कंट्रोल भी कर सकते हैं। नीचे <marquee> मार्की टैग का उपयोग उदाहरण सहित Source Code मे बताया गया है।
| Marquee Attributes | Value | Description |
| bgcolor | color name | बैकग्राउंड मे कलर सेट करने के लिए |
| direction | right, left, up, down | एलेमेन्ट को चारों दिशाओं मे स्क्रॉल कराने के लिए |
| loop | number | नंबर ऑफ टाइम्स स्क्रॉल कराने के लिए |
| height | pixel or % | मार्की हाइट सेट करने के लिए |
| width | pixel or % | मार्की चौड़ाई सेट करने के लिए |
| hspace | pixel | दो एलेमेन्ट के बीच होरीजॉन्टल स्पेस देने के लिए |
| vspace | pixel | दो एलेमेन्ट के बीच वर्टिकल स्पेस देने के लिए |
| behavior | alternate, scroll, slide | Alternate- स्क्रॉल और फिर विपरीत दिशा में वापस, Scroll- यह डिफ़ॉल्ट वैल्यू है एक ही दिशा मे स्क्रॉल, Slide- एक बार स्क्रॉल |
Source Code
<html>
<head>
<title>HTML Images</title>
</head>
<body>
<marquee>This text will scroll from right to left</marquee>
<marquee direction="up" hspace="40">This text will scroll from bottom to top</marquee>
<marquee direction="down" width="250" height="200" behavior="alternate" style="border:solid">
<marquee >This text will bounce</marquee>
</marquee>
<marquee behavior="alternate" bgcolor="pink">
<img src="image.jpg">
</marquee>
</body>
</html>
Code Output 👇
HTML List
HTML पेज मे लिस्ट बनाने के लिए <ul> तथा <ol> टैग का उपयोग किया जाता है। <ul> टैग द्वारा अनऑर्डर लिस्ट (Un-order List) बना सकते हैं। अनऑर्डर लिस्ट मे लिस्ट आइटम्स का कोई क्रम नहीं होता है यानि लिस्ट आइटम किसी भी क्रम मे हो सकते हैं, अनऑर्डर लिस्ट आइटम्स को सिम्बल जैसे – ब्लॉक, सर्कल आदि का उपयोग करके दर्शाते हैं। <ol> टैग द्वारा ऑर्डर लिस्ट (Order List) बना सकते हैं, इसमे प्रत्येक लिस्ट आइटम को दर्शाने के लिए एक ऑर्डर नंबर होता है। जैसे – (1,2,3), (A,B,C) या (I,II,III,IV) इत्यादि। नीचे <ol>तथा <ul> टैग का उपयोग उदाहरण व सोर्स कोड (Source Code) सहित बताया गया है।
| <ol> Attributes | Value | Description |
| reversed | reversed | लिस्ट ऑर्डर को रीवर्स करने के लिए |
| start | number | स्टार्टिंग वैल्यू डिफाइन करने के लिए |
| type | 1,A,a,I,i | लिस्ट टाइप डिफाइन करने के लिए |
| <ul> Attributes | Value | Description |
| type | circle, square, disk, none | लिस्ट टाइप डिफाइन करने के लिए |
Source Code : Order List and Un-order List
<html>
<head>
<title>HTML List</title>
</head>
<body>
<h4>Order List Example</h4>
<p>Default list style</p>
<ol>
<li>Cheese Pizza</li>
<li>Veggie Pizza</li>
<li>Margherita Pizza</li>
<li>Meat Pizza</li></ol>
<h4>Un-order List Example</h4>
<ul>
<li>Cheese Pizza</li>
<li>Veggie Pizza</li>
<li>Margherita Pizza</li>
<li>Meat Pizza</li></ul>
</body>
</html>
Code Output 👇
Order List Example
- Cheese Pizza
- Veggie Pizza
- Margherita Pizza
- Meat Pizza
Un-order List Example
- Cheese Pizza
- Veggie Pizza
- Margherita Pizza
- Meat Pizza
Source Code : Other Order List Example
<html>
<head>
<title>HTML List Style</title>
</head>
<body>
<h4>Order List Example</h4><hr>
<p>Alphabetic list style</p>
<ol type="A">
<li>Cheese Pizza</li>
<li>Veggie Pizza</li>
<li>Margherita Pizza</li>
<li>Meat Pizza</li></ol>
<p>Roman list style</p>
<ol type="i">
<li>Cheese Pizza</li>
<li>Veggie Pizza</li>
<li>Margherita Pizza</li>
<li>Meat Pizza</li></ol>
<p>Specific number list style</p>
<ol type="4">
<li>Cheese Pizza</li>
<li>Veggie Pizza</li>
<li>Margherita Pizza</li>
<li>Meat Pizza</li></ol>
<p>Reverse list example</p>
<ol type="4" reversed>
<li>Cheese Pizza</li>
<li>Veggie Pizza</li>
<li>Margherita Pizza</li>
<li>Meat Pizza</li></ol>
</body>
</html>
Source Code : Other Un-order List Example
<html>
<head>
<title>HTML List Style</title>
</head>
<body>
<h4>Un-order List Example</h4><hr>
<p>Default bullet list style (Disc)</p>
<ul>
<li>Cheese Pizza</li>
<li>Veggie Pizza</li>
<li>Margherita Pizza</li>
<li>Meat Pizza</li></ul>
<p>Square box list style</p>
<ul type="square">
<li>Cheese Pizza</li>
<li>Veggie Pizza</li>
<li>Margherita Pizza</li>
<li>Meat Pizza</li></ul>
<p>Circle bullet list style</p>
<ul type="circle">
<li>Cheese Pizza</li>
<li>Veggie Pizza</li>
<li>Margherita Pizza</li>
<li>Meat Pizza</li></ul>
<p>None list example</p>
<ul type="none">
<li>Cheese Pizza</li>
<li>Veggie Pizza</li>
<li>Margherita Pizza</li>
<li>Meat Pizza</li></ul>
</body>
</html>
Multi Level List
इस प्रकार की लिस्ट स्टाइल के अंतर्गत किसी लिस्ट (Order or Un-order List) के अंदर दूसरी Order/Un-order List स्टार्ट कर सकते हैं, और उस लिस्ट के अंदर फिर से एक नई लिस्ट स्टार्ट कर सकते हैं। नीचे मल्टी लेवल लिस्ट स्टाइल का उदाहरण सोर्स कोड सहित बताया गया है।
Source Code : Multi Level List
<html>
<head>
<title>HTML Multi Level List</title>
</head>
<body>
<ol>
<li>Veggie Pizza</li>
<ul>
<li>Cheese Pizza</li>
<ol>
<li>Haff Pizza</li>
<li>Full Pizza</li>
</ol>
<li>Vegetables Pizza</li>
<li>Vegetables and Cheese Pizza</li>
</ul>
<li>Margherita Pizza</li>
<li>Meat Pizza</li></ol>
</body>
</html>
Code Output 👇
- Veggie Pizza
- Cheese Pizza
- Haff Pizza
- Full Pizza
- Vegetables Pizza
- Vegetables and Cheese Pizza
- Margherita Pizza
- Meat Pizza
Description Lists
डिस्क्रिप्शन लिस्ट टर्म्स की एक लिस्ट है, जिसमें प्रत्येक टर्म का डिस्क्रिप्शन होता है। इस लिस्ट मे उपयोग होने वाले टैग्स का विवरण निम्न प्रकार है।
- <dl> यह टैग Description List डिफाइन करता है।
- <dt> यह टैग Term डिफाइन करता है।
- <dd> यह टैग प्रत्येक टर्म (Term) का डिस्क्रिप्शन डिफाइन करता है।
Source Code : Description List
<html>
<head>
<title>HTML Description List</title>
</head>
<body>
<dl>
<dt>Coffee</dt>
<dd>Hot coffee</dd>
<dd>Cold coffee</dd>
<dt>Tea</dt>
<dd>Black Tea</dd>
<dd>Milk Tea</dd>
<dd>Green Tea</dd>
</dl>
</body>
</html>
Code Output 👇
- Coffee
- Hot coffee
- Cold coffee
- Tea
- Black Tea
- Milk Tea
- Green Tea
HTML Table
HTML पेज मे टेबल बनाने के लिए <table> टैग का उपयोग किया जाता है, किसी डाटा को रो (Row) और कॉलम (Column) मे लिखने के लिए टेबल का उपयोग किया जाता है। टेबल बनाने के लिए <table> टैग के साथ अन्य टैग भी इस्तेमाल किए जाते हैं, जिनका विवरण निम्न प्रकार है।
- <tr> इस टैग का प्रयोग टेबल रो बनाने के लिए किया जाता है।
- <th> इस टैग का प्रयोग टेबल हेडिंग बनाने के लिए किया जाता है।
- <td> इस टैग का प्रयोग टेबल सेल बनाने के लिए किया जाता है, टेबल मे जो भी डाटा लिखना होता है वह इसी टैग मे लिखते हैं।
- <caption> इस टैग का प्रयोग टेबल का कैप्शन देने के लिए किया जाता है।
- <thead>इस टैग का प्रयोग टेबल हेडर डिफाइन करने के लिए किया जाता है।
- <tbody> इस टैग का प्रयोग टेबल बॉडी डिफाइन करने के लिए किया जाता है।
- <tfoot> इस टैग का प्रयोग टेबल फूटर डिफाइन करने के लिए किया जाता है।
टेबल <table> टैग के साथ इस्तेमाल होने वाले ऐट्रब्यूट निम्न हैं।
| Table Attributes | Value | Description |
| bgcolor | color name | टेबल का बैकग्राउंड कलर डिफाइन करने के लिए |
| border | number | टेबल का बॉर्डर सेट करने के लिए |
| bordercolor | color name | टेबल व सेल बॉर्डर कलर डिफाइन करने के लिए |
| width | number or % | टेबल की चौड़ाई सेट करने के लिए |
| height | number or % | टेबल की ऊंचाई सेट करने के लिए |
| align | right, left, center | टेबल का अलाइनमेंट सेट करने के लिए |
| cellspacing | number | टेबल मे दो सेल के बीच स्पेस देने के लिए |
| cellpadding | number | सेल बॉर्डर और सेल इनफार्मेशन के बीच स्पेस देने के लिए |
Source Code
<html>
<head>
<title>HTML Table</title>
</head>
<body>
<table border="1" bordercolor="red">
<tr><th>Name</th><th>Age</th><th>Qualification</th></tr>
<tr><td>Kajal Verma</td><td>32</td><td>MBA</td></tr>
<tr><td>Lalit Mehta</td><td>40</td><td>Phd.</td></tr>
<tr><td>Rahul Verma</td><td>31</td><td>M.Sc</td></tr>
<caption>Employee Records</caption>
</table>
</body>
</html>
Code Output 👇
| Name | Age | Qualification |
|---|---|---|
| Kajal Verma | 32 | MBA |
| Lalit Mehta | 40 | Phd. |
| Rahul Verma | 31 | M.Sc |
Table <thead>, <tbody> & <tfoot> Property
HTML टेबल मे <thead> टैग का इस्तेमाल टेबल हेडर के लिए, <tbody> टैग का इस्तेमाल टेबल बॉडी के लिए तथा <tfoot> का इस्तेमाल टेबल फूटर डिफाइन करने के लिए किया जाता है। इस तीनों टैग मे समान प्रॉपर्टी इस्तेमाल की जाती हैं, जैसे – bgcolor, align आदि। नीचे तीनों टैग का इस्तेमाल करना उदाहरण सहित सोर्स कोड के साथ बताया गया है।
Source Code
<html>
<head>
<title>HTML Table</title>
</head>
<body>
<table border="1" bordercolor="red" width="50%">
<caption>Employee Records</caption>
<thead bgcolor="cyan" align="center">
<tr><th>Name</th><th>Age</th><th>Qualification</th></tr></thead>
<tbody bgcolor="yellow" align="center">
<tr><td>Kajal Verma</td><td>32</td><td>MBA</td></tr>
<tr><td>Lalit Mehta</td><td>40</td><td>Phd.</td></tr>
<tr><td>Rahul Verma</td><td>31</td><td>M.Sc</td></tr></tbody>
<tfoot bgcolor="megenta" align="center">
<tr><td colspan="3">ABC Company</td></tr></tfoot>
</table>
</body>
</html>
Code Output 👇
| Name | Age | Qualification |
|---|---|---|
| Kajal Verma | 32 | MBA |
| Lalit Mehta | 40 | Phd. |
| Rahul Verma | 31 | M.Sc |
| ABC Company | ||
Table Cellspacing & Cellpadding
टेबल मे यदि दो सेल (Cell) के बीच गैप दिखाना है तो cellspacing प्रॉपर्टी का इस्तेमाल किया जाता है, और यदि सेल मे लिखे डाटा और सेल बॉर्डर के बीच गैप (space) यानि पैडिंग लाना है तो cellpadding का इस्तेमाल किया जाता है। नीचे Cellspacing और Cellpadding का उदाहरण सोर्स कोड सहित बताया गया है।
Source Code
<html>
<head>
<title>HTML Table</title>
</head>
<body>
<table border="1" bordercolor="red" width="50%" bgcolor="yellow" cellspacing="10" cellpadding="10">
<thead>
<tr><th>Name</th><th>Age</th><th>Qualification</th></tr>
<tr><td>Kajal Verma</td><td>32</td><td>MBA</td></tr>
<tr><td>Lalit Mehta</td><td>40</td><td>Phd.</td></tr>
<tr><td>Rahul Verma</td><td>31</td><td>M.Sc</td></tr>
</table>
</body>
</html>
Code Output 👇
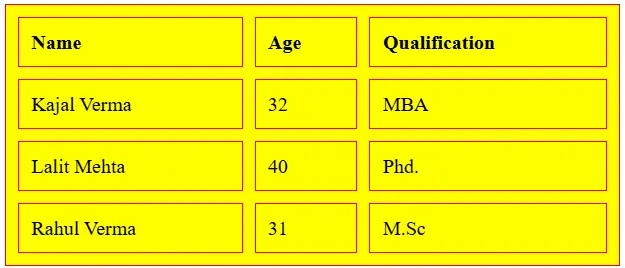
Table Rowspan & Colspan
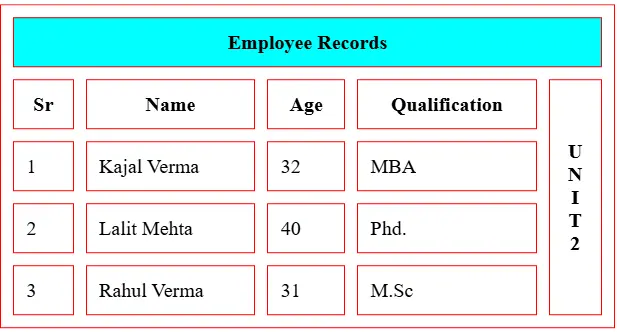
एचटीएमएल टेबल मे रोस्पैन (Rowspan) और कॉल्सपैन (Colspan) प्रॉपर्टी द्वारा टेबल सेल्स को आपस मे मर्ज (Merge) करा सकते हैं। यह प्रॉपर्टी <td>, <th> टैग के लिए वर्क करती हैं। Colspan टेबल सेल्स को होरीजॉन्टल (Horizontally) तथा Rowspan सेल्स को वर्टिकली (Vertically) मर्ज करता हैं। नीचे रोस्पैन तथा कॉल्सपैन का उदाहरण सोर्स कोड सहित बताया गया है।
Source Code
<html>
<head>
<title>HTML Table</title>
</head>
<body>
<table border="1" bordercolor="red" width="50%" cellspacing="10" cellpadding="10">
<tr><th colspan="5" bgcolor="cyan">Employee Records</th></tr>
<tr><th>Sr</th><th>Name</th><th>Age</th><th>Qualification</th><th rowspan="4">U<br>N<br>I<br>T<br> 2</th></tr>
<tr><td>1</td><td>Kajal Verma</td><td>32</td><td>MBA</td></tr>
<tr><td>2</td><td>Lalit Mehta</td><td>40</td><td>Phd.</td></tr>
<tr><td>3</td><td>Rahul Verma</td><td>31</td><td>M.Sc</td></tr>
</table>
</body>
</html>
Code Output 👇
HTML Links
HTML पेज मे किसी टेक्सट या इमेज पर किसी अन्य डॉक्यूमेंट या वेबपेज का लिंक लगाने के लिए <a> Anchor टैग का उपयोग किया जाता है। <a> टैग हाइपरलिंक को परिभाषित करता है, जिसका उपयोग एक पेज से दूसरे पेज पर लिंक करने के लिए किया जाता है।
<a> की सबसे महत्वपूर्ण विशेषता href है, जो लिंक के गंतव्य को इंगित करती है। डिफ़ॉल्ट रूप से, लिंक सभी ब्राउज़रों में इस प्रकार दिखाई देते हैं:
- एक Unvisited लिंक Underline और Blue होता है
- एक Visited लिंक Underline और Purple होता है
- एक Active लिंक Underline और Red होता है
<a> टैग के विभिन्न ऐट्रब्यूट प्रॉपर्टी का इस्तेमाल करके लिंक को विभिन्न प्रकार से मैनेज कर सकते हैं। नीचे <a>टैग का विभिन्न प्रॉपर्टी सहित इस्तेमाल करना सोर्स कोड सहित निम्न उदाहरण मे बताया गया है।
| Anchor Attributes | Value | Description |
| href | url | उस पृष्ठ का URL डालें जिसपर लिंक द्वारा पहुंचना है |
| target | _bank, _self, _top, _parent | डॉक्यूमेंट को कहां खोलना है यह निर्दिष्ट करता है। _blank (Open link in new window), _self (Open link in same window), _top (Open link on top window), _parent (Open link in parent window) |
| download | file_name | जब कोई उपयोगकर्ता हाइपरलिंक पर क्लिक करेगा तो टारगेट डाउनलोड हो जाएगा |
| rel | alternate, author, bookmark, nofollow, search, tag | वर्तमान पेज और लिंक किए गए पेज के बीच संबंध निर्दिष्ट करता है |
| type | media_type | लिंक किए गए डॉक्यूमेंट का मीडिया प्रकार निर्दिष्ट करता है |
Source Code
<html>
<head>
<title>HTML Links</title>
</head>
<body>
<p>Link of Webpage on text</p>
<a href="https://www.google.co.in">Click on this link to open Google homepage.</a><hr>
<p>Open link in new window</p>
<a href="https://www.google.co.in" target="_blank">Click on this link to open Google homepage.</a><hr>
</p>Open link in new window</p>
<a href="https://www.google.co.in" target="_self">Click on this link to open Google homepage.</a><hr>
<p>Link on an Image</p>
<a href="https://www.google.co.in"><img src="https://digitaltaiyari.com/wp-content/uploads/2025/02/music-cover-image.jpg"></a><hr>
<p>Link to another HTML document</p>
<a href="Filename.html">Click to open another page</a><hr>
<p>Link to Download a music file</p>
<a href="Filename.mp3" download>Click to Download File</a><hr>
<p>Link to Email someone</p>
<a href="mailto:someone@example.com">Send email</a><hr>
<p>Link to Call someone</p>
<a href="tel:+5732478901">+57 324 78 901</a><hr>
</body>
</html>
Code Output👇
Link of Webpage on text
Click on this link to open Google homepage.Open link in new window
Click on this link to open Google homepage.Open link in new window Click on this link to open Google homepage.
Link on an Image

Link to another HTML document
Click to open another pageLink to Download a file
Click to Download FileLink to Email someone
Send emailLink to Call someone
+57 324 78 901HTML Cross Reference Link
HTML क्रॉस-रेफरेंस एक लिंक है जो रीडर्स को किसी पेज के विशिष्ट भागों, जैसे पैराग्राफ, आंकड़े या तालिकाओं (Tables) तक ले जाता है। ऐसा करने का एक तरीका हाइपरलिंक और क्रॉस-रेफरेंस का उपयोग करना है, ये दो प्रकार के लिंक हैं जो आपकी जानकारी के विभिन्न हिस्सों को जोड़ते हैं। हाइपरलिंक वे लिंक होते हैं जो अन्य वेब पेजों या संसाधनों की ओर ले जाते हैं, जबकि क्रॉस-रेफरेंस वे लिंक होते हैं जो उसी पेज के भीतर अन्य सेक्शन या एलिमेंट्स (Sections or elements) की ओर इशारा करते हैं।
<html>
<head>
<title>HTML Links</title>
</head>
<body>
<a href="#sec1"><h5>Goto cross-reference 1</h5></a>
<a href="#sec2"><h5>Goto cross-reference 2</h5></a>
<a href="#sec3"><h5>Goto cross-reference 3</h5></a>
<hr>
<a id="sec1"><h4>This cross-reference 1</h4></a>
<p>Lorem Ipsum is simply dummy text of the printing and typesetting industry. Lorem Ipsum has been the industry's standard dummy text ever since the 1500s, when an unknown printer took a galley of type and scrambled it to make a type specimen book. It has survived not only five centuries, but also the leap into electronic typesetting, remaining essentially unchanged. It was popularised in the 1960s with the release of Letraset sheets containing Lorem Ipsum passages, and more recently with desktop publishing software like Aldus PageMaker including versions of Lorem Ipsum.</p>
<a id="sec2"><h4>This is cross-reference 2</h4></a>
<p>Lorem Ipsum is simply dummy text of the printing and typesetting industry. Lorem Ipsum has been the industry's standard dummy text ever since the 1500s, when an unknown printer took a galley of type and scrambled it to make a type specimen book. It has survived not only five centuries, but also the leap into electronic typesetting, remaining essentially unchanged. It was popularised in the 1960s with the release of Letraset sheets containing Lorem Ipsum passages, and more recently with desktop publishing software like Aldus PageMaker including versions of Lorem Ipsum.</p>
<a id="sec3"><h4>This is cross-reference 3</h4></a>
<p>Lorem Ipsum is simply dummy text of the printing and typesetting industry. Lorem Ipsum has been the industry's standard dummy text ever since the 1500s, when an unknown printer took a galley of type and scrambled it to make a type specimen book. It has survived not only five centuries, but also the leap into electronic typesetting, remaining essentially unchanged. It was popularised in the 1960s with the release of Letraset sheets containing Lorem Ipsum passages, and more recently with desktop publishing software like Aldus PageMaker including versions of Lorem Ipsum.</p>
</body>
</html>
Code Output👇
Goto Cross-reference 1
Goto Cross-reference 2
Goto Cross-reference 3
This Cross-reference 1
Lorem Ipsum is simply dummy text of the printing and typesetting industry. Lorem Ipsum has been the industry’s standard dummy text ever since the 1500s, when an unknown printer took a galley of type and scrambled it to make a type specimen book. It has survived not only five centuries, but also the leap into electronic typesetting, remaining essentially unchanged. It was popularised in the 1960s with the release of Letraset sheets containing Lorem Ipsum passages, and more recently with desktop publishing software like Aldus PageMaker including versions of Lorem Ipsum.
This is Cross-reference 2
Lorem Ipsum is simply dummy text of the printing and typesetting industry. Lorem Ipsum has been the industry’s standard dummy text ever since the 1500s, when an unknown printer took a galley of type and scrambled it to make a type specimen book. It has survived not only five centuries, but also the leap into electronic typesetting, remaining essentially unchanged. It was popularised in the 1960s with the release of Letraset sheets containing Lorem Ipsum passages, and more recently with desktop publishing software like Aldus PageMaker including versions of Lorem Ipsum.
This is Cross-reference 3
Lorem Ipsum is simply dummy text of the printing and typesetting industry. Lorem Ipsum has been the industry’s standard dummy text ever since the 1500s, when an unknown printer took a galley of type and scrambled it to make a type specimen book. It has survived not only five centuries, but also the leap into electronic typesetting, remaining essentially unchanged. It was popularised in the 1960s with the release of Letraset sheets containing Lorem Ipsum passages, and more recently with desktop publishing software like Aldus PageMaker including versions of Lorem Ipsum.
HTML Form
एचटीएमएल मे यूजर एंट्री फॉर्म पेज बनाने के लिए <form> टैग का उपयोग होता है। रजिस्ट्रेशन फॉर्म, कान्टैक्ट फॉर्म, किसी भी प्रकार का एंट्री फॉर्म <form> टैग की मदद से क्रीऐट कर सकते हैं। नीचे लिस्ट मे फॉर्म टैग के साथ उपयोग होने वाले एट्रिब्यूट निम्न लिखित है।
action : एक्शन एट्रिब्यूट उस वेब पेज को परिभाषित करता है जहाँ जानकारी आगे बढ़ती है।
<form action="filename.html" method="post">
autocomplete : यह एट्रिब्यूट फॉर्म की खाली इनपुट फील्ड को स्वतः कम्प्लीट करता है, यदि autocomplete=”on” रखा जाता है। autocomplete=”off” सेट करने पर फील्ड स्वतः कम्प्लीट नहीं होती है।
<form action="filename.html" method="get" autocomplete="on">
<form action="filename.html" method="get" autocomplete="off">
method : यह एट्रिब्यूट HTTP Method को परिभाषित करती है जिसका उपयोग ब्राउज़र फ़ॉर्म सबमिट करने के लिए करता है। method एट्रिब्यूट की वैल्यू (Value) निम्न प्रकार हैं।
- get – फ़ॉर्म सबमिशन के लिए डिफ़ॉल्ट मेथड है, जिसका अर्थ है कि यदि हम विधि का नाम स्पष्ट रूप से डिफाइन नहीं करते हैं, तो फ़ॉर्म डेटा भेजने के लिए GET विधि का उपयोग करेगा।
- post – Post मेथड का उपयोग HTTP Request बॉडी के अंदर फ़ॉर्म डेटा भेजने के लिए किया जाता है। यह GET विधि से अधिक सुरक्षित है।
<form action="filename.html" method="get">
<form action="filename.html" method="post">
target : यह एट्रिब्यूट यह निर्धारित करती है कि फ़ॉर्म सबमिट करने के बाद प्रतिक्रिया को कहाँ खोलना है। target एट्रिब्यूट के साथ उपयोग की जाने वाली वैल्यू निम्नलिखित हैं।
- _blank – यह प्रतिक्रिया को नई विंडो या टैब में खोलता है।
- _self – यह प्रतिक्रिया को उसी विंडो में खोलता है जिस पर क्लिक किया गया था।
- _parent – यह प्रतिक्रिया को यह मूल विंडो में खोलता है।
- _top – यह प्रतिक्रिया को विंडो के पूर्ण भाग में खोलता है।
<form action="filename.html" method="get" target="_blank">
<form action="filename.html" method="get" target="_self">
<form action="filename.html" method="get" target="_parent">
<form action="filename.html" method="get" target="_top">
novalidate : यह ऐट्रब्यूट HTML5 का नया जोड़ा गया Boolean attribute है। अगर हम इस attribute को फॉर्म में apply करते हैं तो यह किसी भी प्रकार का validation नहीं करता और फॉर्म को सबमिट कर देता है।
<form action="filename.html" method = "get" novalidate>
name : यह एट्रिब्यूट इनपुट एलिमेन्ट (input element) का नाम परिभाषित करती है। जब हम फ़ॉर्म सबमिट करते हैं तो name और value HTTP अनुरोध में शामिल होते हैं।
<form action="filename" method = "get">
     Enter name:<br><input type="name" name="uname"><br>
     Enter age:<br><input type="number" name="age"><br>
     Enter email:<br><input type="email"><br>
     <input type="submit" value="Submit">
</form>
enctype : HTML enctype ऐट्रब्यूट सर्वर पर फ़ॉर्म सबमिट करते समय फ़ॉर्म-सामग्री के एन्कोडिंग प्रकार को परिभाषित करती है। enctype के संभावित मान निम्न हो सकते हैं:
- application/x-www-form-urlencoded – यदि फॉर्म में enctype ऐट्रब्यूट शामिल नहीं है, तो यह डिफ़ॉल्ट एन्कोडिंग प्रकार है। फॉर्म सबमिट करने से पहले सभी वर्णों को एन्कोड किया जाता है।
- multipart/form-data – यह किसी भी वर्ण को एनकोड नहीं करता है। इसका उपयोग तब किया जाता है जब हमारे फॉर्म में फ़ाइल-अपलोड कंट्रोल होते हैं।
- text/plain – इस एनकोडिंग प्रकार में केवल स्पेस को + चिन्ह में एनकोड किया जाता है तथा किसी अन्य विशेष वर्ण को एनकोड नहीं किया जाता।
<form action="filename" method="post" enctype="application/x-www-form-urlencoded">
<form action="filename.html" method="post" enctype="multipart/form-data">
<form action="filename.html" method="post" enctype="text/plain" >
नोट – इस पेज मे अभी नोट्स पोस्ट किए जाने बाकी हैं। रुकावट के लिए माफी🙏आगे के नोट्स जल्द ही पब्लिश किए जाएंगे।
इस वेबसाईट पर आने के लिए आपका धन्यवाद!🙏
Thankyou so much
Aapke is website ke jariye mujhe bahut help mila
Dhanyawad 🙏🙏
Dear Priya, Appka Sukriya🙏
Awesome Notes from basic to advance level